Generating PDF, reports or any document in MVC is generally the basic requirement in most of the projects. To address this requirement, we can leverage a third party tool “Rotativa” to generate PDF documents. Rotativa is an asp.net library which helps in spawning PDFs from MVC controller. This tool gives us the flexibility to create PDFs directly from views, partial views or URL.
We need to follow certain steps to generate PDF from Rotativa tool:
- Open Visual Studio.
- Select File -> New Project.
- Select ASP.NET MVC 4 Web Application under Templates-> Visual C#->Web->Visual Studio 2012.

4. Select Empty or Internet Application template, and select Razor as the view engine.
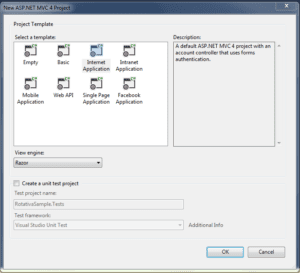
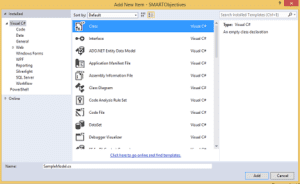
5. Add a class in Models folder with SampleModel name.
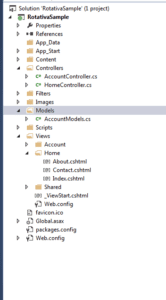
6. Add a Controller in Controllers folder with SampleController name.

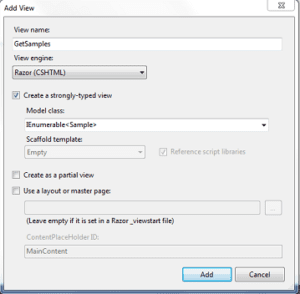
7. Add a strongly typed view to create a view aligned with a particular class or a dynamic view for creating a generalized view.
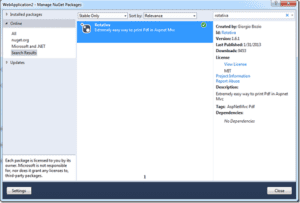
8. To leverage the Rotativa tool in our application to generate PDF, we need to install Rotativa using Manage nuget packages.
9. Right click on References folder in Solution and click on Manage Nuget Packages. Search online and add Rotativa as shown below:
10. Add this line of code in SampleController class.
using System;
using System.Collections.Generic;
using System.Linq;
using System.Web;
using System.Web.Mvc;
using RotativaSample.Models;
namespace RotativaSample.Controllers
{
public class SampleController : Controller{
public ActionResult Index(){
return View();
}
public ActionResult GetSamples()
{ SampleModel obj=new SampleModel();
List sampleList = new List();
sampleList = obj.GetSampleDetails();
return View(sampleList);
}
public ActionResult GeneratePDF()
{ SampleModel obj = new SampleModel();
List sampleList = new List<samplemodel< span=””></samplemodel<>>();
sampleList = obj.GetSampleDetails();
return new Rotativa.ViewAsPdf(sampleList)
{
PageSize = Rotativa.Options.Size.A4,
PageOrientation = Rotativa.Options.Orientation.Landscape,
PageMargins = new Margins(12, 12, 12, 12),// it’s in millimeters
PageWidth = 180,
PageHeight = 297,
CustomSwitches = “–outline –print-media-type –footer-center ”Confidential” –footer-right [page]/[toPage] –footer-left [date]“
}; } } }
How to add header and footer in Rotativa PDF
To add header and footer in Rotativa pdf, we need to add “CustomSwitches” as mentioned in the above code.
Sample.cs: Model Class
using System;
using System.Collections.Generic;
using System.Linq;
using System.Web;
using System.Web.Mvc;
namespace RotativaSample.Models
{ public class Sample
{ public int EmpId {get;set;}
public string Name { get;set;}
public string Email {get;set;}
public string Country { get;set;}
}
public List GetSampleDetails() {
List samples = new List();
samples.Add(new SampleModel() { EmpId = 491, Name = “abc”, Email = “abc@gmailcom”, Country = “India” });
samples.Add(new SampleModel() { EmpId = 492, Name = “xyz”, Email = “xyz@gmail.com”, Countr y = “India” });
return (samples);
}
}}
Add another view in Views folder with “GetSamples.cshtml” name and add the below code:
@model dynamic
@{
Layout = null;
}
GetSamples
@foreach (var item in Model)
{
}
Employee Id
|
Employee Name
|
|---|---|
@item.EmpI
|
@item.Name
|
1. To leverage the Rotativa tool in our application to generate PDF, we need to install Rotativa using “Manage nuget packages”.
2. Right click on References folder in Solution and click on Manage Nuget Packages. Search online and add Rotativa as shown below:
How to add CSS in Rotativa PDF
When we are using SSRS reports we are pampered with automatic features, such as paging, headers, footers, numbering. HTML to PDF converter lacks this feature, so if you need to add CSS, you need to use inline CSS. You need to add CSS to your html page in style section
E.g.: Add a page break
Then add this line of code before the starting of any page:
Conclusion
Many LOB applications require printable documents in PDF format such as invoices, receipts, etc. Generating such types of printable documents in Asp.Net MVC application is a little bit complex. By leveraging the Rotativa tool in MVC application we can easily generate the printable PDF docs with custom header and footer. You can follow the above process to generate PDF in asp.net MVCwith Rotativa.
Rotativa tool is very easy to use and gives full control over header and footer elements such as adding page number, date, etc.
NEED HELP IN ASP.NET MVC? CONTACT US NOW

Alpa Sarupria
Software Developer
Advaiya Solutions Inc
Udaipur, Rajasthan, India


