Before getting you into the details of performance optimization, let me give a brief note on Bundling and Minification of JS/CSS files.
What is a Bundle?
Bundle is simply logical group of files that could be referenced by unique name and loaded with one HTTP request. You can create bundle for JavaScript and CSS.
What is Minification?
It’s a process of removing unnecessary whitespaces, line breaks and comments from code to reduce its size, thereby improving load times.
Bundling and minification are the performance optimization techniques that can help to improve load time by reducing the number of requests to the server and reducing the size of requested assets (such as JavaScript and CSS.)
Scenario without Bundling and Minification
Most of the current major browsers limit the number of simultaneous connections to six per hostname. This means that while six requests are being executed, any additional requests for assets on a host will be queued in the browser. In the below image, the IE developer tool network tab shows the timings for assets required by the ‘Index view’ of a sample application.

- The brown bars show the time for which the request is queued by the browser waiting for the six connections to complete.
- The yellow bars show the request time taken to send the request and receive the first response from the server.
- The blue bars represent the time taken to receive the response data from the server.
You can get detailed timing information by double-clicking on an asset. For example, the following image shows the load time details of the file.

In the preceding image, ‘Start’ event shows the time that a request was queued because of the browser limit of only six simultaneous connections. This request was queued for 187 milliseconds waiting for another request to complete.
Bundling
Bundling makes it easy to combine multiple files into a single file. It can create bundles for JavaScript, CSS, etc. Lesser files mean lesser HTTP requests which in turn improves the initial page load performance.
How to do it
Adding reference:
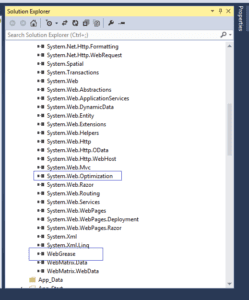
First of all, add the references for both WebGrease.dll and System.Web.Optimization.dll to your projects as shown below. These DLLs can be downloaded from Internet or using NuGet Package Manager.

Creating Bundle
After adding required DLL references, now create the bundle for your JS and CSS files within the Global.asax file as shown below. Here, I have created the bundle for all required JS and CSS files. You can also add your own custom JS and CSS files with complete path using ‘Include’ method.

The preceding code creates a new JavaScript bundle named ~/bundles/jquery that includes debug and minified files in the ‘Scripts’ folder that compares the wild card string “~/Scripts/jquery-{version}.js” from bundle.config. This means in debug mode, jquery-2.1.3.js will be added to the bundle and in release mode, jquery-2.1.3.min.js will be added. Below common conventions are followed by the bundling framework:
- Selecting “.min” file for release when “FileX.min.js” and “FileX.js” exist.
- Selecting the non “.min” version for debug.
- Ignoring “-vsdoc” files (such as jquery-2.1.3-vsdoc.js), which are used for IntelliSense.
The {version} wild card shown above is used to automatically create a jQuery bundle with the appropriate version of jQuery in your ‘Scripts’ folder. In the above example, following benefits are provided by using wild card:
- It allows to use NuGet to update to a latest jQuery version without changing the preceding bundling code or jQuery references in your view pages.
- It automatically selects the full version for debug configurations and the “.min” version for release builds.
Registering Bundle
You will now need to register above created bundles with in ‘Application Start’ event of Global.asax as below:

Adding Bundles to Layout Page in MVC3
You can add reference for created bundles in the project’s view pages and layouts as below:
@Scripts.Render(“~/bundles/jquery”)
@Scripts.Render(“~/bundles/jqueryui”)
@Scripts.Render(“~/bundles/jqueryval”)
Allow Bundling and Minification in debug mode
Bundling and minification doesn’t work in debug mode, so to enable bundling and minification, set the debug value in Web.config file to “false”. You can also override the Web.config setting with the ‘EnableOptimizations’ property on the ‘BundleTable’ class. The following lines of code within ‘Application_Start’ event of Global.asax enables bundling and minification, and in the Web.config file it overrides respective settings.
protected void Application_Start(){
BundleConfig.RegisterBundles(BundleTable.Bundles);
//Enabling Bundling and Minification
BundleTable.EnableOptimizations = true;
}
How it works
Now run your application and you can see that all the JS and CSS files are converted to single JS and CSS files as shown below:
![]()
Minification
Minification is a technique for removing unnecessary characters (like white spaces, newlines, and tabs) and comments from the JavaScript and CSS files to reduce the size which causes improved load times of a webpage. There are various tools to minify the JS and CSS files. YUI Compressor and JSMin are the most popular tools for minifying the JS and CSS files. Use these tools for minifying your JS and CSS files and in your application use with “.min” suffix, so that you can easily identify that this is a minimize version of your CSS or JS file.
Minification with VS2013 and Web Essentials 2013 extension
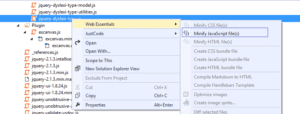
I would like to share how you can create minify version of your JS or CSS file using ‘Web Essentials’ extension and VS2013. Right click on JS or CSS file, select “Web Essential” option and click on the highlighted “Minify JavaScript/CSS file(s)” as shown in the below image.

With the help of this tool, every time you update your code in original JS or CSS file, the minify version of these files get automatically updated.
Busting Browser’s Cache by Bundling
As you know, browsers cache resources on the basis of accessed URLs. The browser first checks its cache when a web page requests a resource to see if there is a resource with the accessed URL. If it exists in cache, then it uses that existing copy instead of getting a new copy from server. So, whenever you change the content of JS and CSS files, it will not reflect on the browser. To reflect these changes, you have to refresh/reload the browser. But bundles automatically takes care of this problem by adding a hash code to each bundle as a query parameter to the URL as shown below.
Whenever you change the content of JS and CSS files, then a new hash code will be generated and rendered to the web page automatically. Through this, the browser will look into a different URL and will get the fresh copy of JS and CSS files.


