How to create and deploy Word Add-on in SharePoint

Office add-in deployment with Com add-in is a tedious task. The Com add-in package has a .msi file or an executable file that requires software deployment interface, and requires pushing the add-in down to every computer using System Center Manager. It gets drearier when there are updates in the add-in, and those are to be pushed on every computer again. To overcome this, a new Office add-in programming model is available for extending Office applications using the JavaScript APIs. Add-in can be quickly built and can be associated with the task pane with the Office products like Word excel, or PowerPoint. In this post, I will explain how to create Word add-in in the SharePoint. These are the basic steps: Create the SharePoint page in pages/site pages’ library. This page will interact with the Word add-in Create the manifest file and add the SharePoint URL in the manifest file Add the manifest file in Office app catalog/network drive Add add-in to the document present in the document library To overcome this, a new Office add-in programming model is available for extending Office applications using the JavaScript APIs. Add-in can be quickly built and can be associated with the task pane with the Office products like Word excel, or PowerPoint. In this post, I will explain how to create Word add-in in the SharePoint. Create SharePoint page Create a SharePoint page in pages/site pages’ library with the name AdWordAddin.aspx. This page has the required office.js, custom js, which will fetch the data from SharePoint list and libraries. This page will open in the custom task pane that is associated with the Word add-in. When the SharePoint page opens in the task pane, it will work in the same context as SharePoint. Create Manifest file Create the manifest file with the below XML. Replace the default URL with the SharePoint page URL created earlier. Save the file as AdAuthoring Smart Panel.xml Deploy the Manifest file on Office App catalog Click on O365 icon and select Admin Navigate to the Admin Center->SharePoint. On the left navigation, click on the App and select App Catalog. Using this, create the new app catalog site collection on SharePoint Once the app catalog site is created, click App for Office from the left navigation Upload the Manifest file Add Office add-in to Word Open the SharePoint site. Click on document library where you want to create the Word file with add-in. Select the document template from the library and open the Word document in the Word desktop (client). On the Ribbon, click on Insert tab, and select Office Add-ins. A dialog box appears with various Office Add-ins available in the Office catalog. Click on My Organization, and select Office add-in AdAuthoring Smart Panel and click on Add button as shown in the below image: AdAuthoring Smart Panel will appear on the right side of the document. This panel is the normal SharePoint page and will work as a task pane. So, this is it! Have any questions or queries? Let me know in the comments below, and we can discuss on it.
Handling larger JSON string values serialization in MVC

Some days back in a project there was a need to fetch AD users and groups from MVC controller in JSON format at run time. I chose return type of controller method as “JsonResult” instead of “ActionResult” and called this method using jQuery ajax call. MVC Method: In this method, users and groups come from AD (Active Directory). It ideally results specified set of users as well as groups. The code for calling MVC method using ajax call: Configuration setting in web.config: Now the problem that arises is – after some time, number of AD users and groups increase, and then when fetching the same, an error occurs due to the length of the string: This happens due to fetching of large amount of data in JSON format via ajax call. So, here are the solution options to it: Solution 1: The common, quick and easy solution for this error is to update the “jsonSerialization” configuration to maximum as below: But, in my case the issue persisted after configuration updates because the JSON received at the success of ajax call was not getting serialized, and was going beyond maximum limit. Solution 2: This issue can also be resolved by using “ContentResult” as return type instead of “JsonResult” and serializing the object before returning to the ajax call. The second solution worked for me, and now I can receive lacs of records from my action method.
Calling Azure Rest Service from VBA

Recently working on a project, my team came across a requirement to call an Azure hosted WCF service from VBA (Visual Basic for Applications). VBA is the programming language used for writing macros in Office documents. We developed a code to call the rest service, which I’m sharing in this post. Note that the WCF service is hosted on Azure – https://myservice.azurewebsites.net/Service.svc, and the request and response from Webservice are in JSON format. Let’s look at the code snippet for calling a rest service in VBA. Step 1: Add the below reference in your VBA project. Go to Tools->References and select Microsoft ActiveX Data Objects 2.8 Library. Click OK Step 2: A common data request function is created, which based on the request type will perform GET or POST request. 1. In Data request method, we pass the Rest service URL and the postParameters list if it is a POST call. If the call is GET, the postParameters value will be blank. 2. Create object of MSXML2.XMLHTTP to carry out the web request. 3. Send the request to Web service. The complete VBA code for data request method is as written below: Function Datarequest(Url As String, Optional postParameters As String = “”) As String Dim objHTTP as Object Dim responseText As String Dim requestType As String If postParameters <> “” Then requestType = “POST” Else requestType = “GET” End If Set objHTTP = CreateObject(“MSXML2.XMLHTTP”) objHTTP.Open requestType, Url, False objHTTP.setrequestheader “Content-Type”, “application/json” If postParameters <> “” Then objHTTP.send postParameters Else objHTTP.send End If responseText = objHTTP.ResponseText Datarequest = responseText End Function Step 3: The GET request to the service is done by appending the parameter values in the URL separated by slash. Below is the code for GET request. Here ‘GetProjectGUID’ is the web method being called and ‘ProjectName’ is the parameter value. Public Function GetProjectGUID(ByVal ProjectName As String) As String Dim Result As String Dim Url As String Dim ProjectID As String Url = WCFServiceUrl + “/GetProjectGUID/” & ProjectName Result = Datarequest(Url) End If End Function WCFServiceUrl is the Azure hosted service Url which will be like “https://testapp.azurewebsites.net/Service.svc” This URL is then passed to Datarequest method created in the first step, which will return the result in the format specified in your web service (XML/JSON). I have used JSON format. If the parameter is integer or boolean, then the webservice method will not accept it directly; it will be represented as query string. So, the request URL from VBA will also look like: Url = WCFServiceUrl + “/MethodName/” & Parameter1Value & “/?Parameter2Name=” & Value Parameter2Name is the parameter name mentioned in the web method in service and Value is the value that needs to be passed. Step 4: The POST Request to the web service is done by passing the parameters list not in the URL but in the body itself. Below is the code for POST request: Public Function CreateTask (ByVal TaskName As String, ByVal ProjectUID As String) As String Dim Result As String Dim Url As String Dim postParameters As String Url = WCFServiceUrl + “/ CreateTask “ postParameters = “{“” TaskName “”:” & Chr(34) & TaskName & Chr(34) & “,”” ProjectUID “”:” & Chr(34) & ProjectUID & Chr(34) & “}” Result = Datarequest(Url, postParameters) CreateTask = Result End Function The rest URL for POST method consists of Web service URL and the method name. The post parameters string is in JSON format. The Webservice URL and postParameters are passed to Datarequest method created in the first step, which will return the result in the format specified in your web service (XML/JSON). So, here you go. Hope you find it helpful!
Export list view web part easily in SharePoint

SharePoint list view web part is used in many SharePoint applications, quite often. But what if there is a need to add an OOTB list view web part on a page through PowerShell script from different environment. I had such a requirement in my project, where I needed to first export the web part and then use it in PowerShell script. But the challenge I faced was OOTB list view web part doesn’t have export option in menu like other web parts have. As you see below, the OOTB search web part has the property to export. But if we try to edit any OOTB list view web part, then the drop down shows no export property, like you see in the below task list. So, I found out this solution to enable Export option in the menu. Step 1: Open the site in SharePoint designer. Go to List and Libraries and open the list. Step 2: In Views section, click on the view which is set as default. Here in the below screen, the task list’s default view is All Tasks. Step 3: Search for ExportControlledProperties. Its default value is False; change this to True and click on Save. Step 4: Open the list in the browser. Now, edit the page and then edit the web part. You will see the Export property now shows up in the drop down. So the quick trick worked! Export all list and libraries web part for customization as required, by just changing the property to true.
SharePoint Approval Workflows with metadata made easy
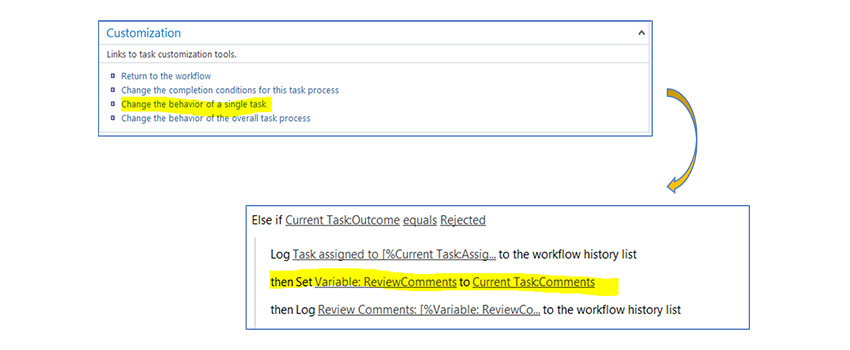
This post talks about the solution to a problem when SharePoint 2013 workflow doesn’t work for document approval workflows.
How to access SharePoint Rest API using OAuth

SharePoint is a web-based collaborative platform that integrates with Microsoft Office. Launched in 2001, SharePoint is primarily sold as a document management and storage system, but the product is highly configurable and usage varies substantially among organizations. Microsoft is supporting OpenID connect at the top of the OAuth 2.0 protocol. OAuth 2.0 helps to define the flow to get the access token by which protected resources can be accessed. This is the explicit flow of authentication with Office365 from the web application. The OpenID is a great way when Office 365 authentication is needed within a web application. Let’s consider a use case where we need to integrate the Office 365 libraries like Graph APIs or SharePoint. Register AD app with your AD Tenant To begin with the authentication process, let’s first create Azure AD app with Azure Active Directory Tenant. It will assign you the Application ID to get the id_token, code and access_token. 1. Login to Azure Portal 2. Choose your Azure AD Tenant (you can pick from the top right corner of the page) 3. Click on App Registration 4. Provide the desired name of the application. Author Recommended WCF SERVICE ON TOP OF SHAREPOINT 2016 HOW TO EXPORT AN OUT OF THE BOX (OOTB) LIST VIEW WEB PART IN SHAREPOINT 5. Select the application type as Web app/API. 6. Provide the Sign-on URL (the base URL of your web application) for e. g https://www.myweb.com 7. Once you have completed the registration process, Azure AD will assign the ApplicationID to your application, and you can copy it and save it for use in future. After registering the AD App, now set the Reply URL to receive tokens from Azure AD app. Set the Reply URL to receive the tokens To get the tokens and other details from Azure AD, you will require to setup the Callback URL/endpoint. This endpoint will be used by Azure AD to provide the tokens to your web application. To setup the Reply URL/Callback/Endpoint click on Reply URLs and add new. Click on Settings and under GENERAL, and click on Reply URLs Paste your Web App URL. Set Required permissions To access the protected resources, you need to assign the required permission Go to Require Permission property Select the required APIs from Settings-> Required permissions -> Click on Add-> Selected API Now assign permission for the selected APIs Select the desired permission – APPLICATION PERMISSION ot DELGATED PERMISSIONS Click on Save Note that there are certain permissions that are assigned by the administrator only. Generate Client Keys/Password After granting the required permissions, you will need a key which is also called client_secret. To generate the key, follow the steps below: Type the name of the key in the Description Set the Expires duration and click on the Save Once you saved the key, you will be able to see the keys, which you can copy and save it to a secure location because it will show only once. Authentication flow using OpenID Connect Send the sign-in request When a web application needs to authenticate the user, he must direct to the /authorize endpoint. The request needs few parameters: The request must include scope = “openid” The response type parameter will be response_type=”id_token+code” The request must include the nonce parameter with a random value The sample request will look like this GET https://login.microsoftonline.com/{tenant}/oauth2/authorize? client_id=<application id> &response_type=id_token+code &redirect_uri=http://mysampleapp.com/callback &response_mode=form_post &scope=openid &state=12345 &nonce=<Random value> In the request header of your callback, you will get the few parameters Id_token code state Wait, you are not done here; to get access tokens you need to call another endpoint. Get the access tokens Need Help in Sharepoint? Contact Us To get the access token, you need to modify the above sign-in request GET https://login.windows.net/tmaasindia.com/oauth2/token?api-version=1.0 client_id=< Your registered Application Id> client_secret=<Your secret key saved earlier> & grant_type=authorization_code &redirect_uri= http://mysampleapp.com/callback &response_mode=form_post &scope=openid &resource=https://service.contoso.com/ &state=12345 &nonce=678910 On the successful response, you will get the request header parameters, mentioned below: “access_token”: “”, “token_type”: “Bearer”, “expires_in”: “3600”, “expires_on”: “”, “resource”: “https://service.contoso.com/”, “refresh_token”: “”, “scope”: “ AllSites.Manage AllSites.Write MyFiles.Read”, “id_token”: “” } On the successful response, we will send the access token and refresh token to callback and by using this call you will be able to send the request to the office365 rest API endpoints Refresh the access tokens In case the access_token is expired/invalid, you can refresh the token by using the /token endpoint mentioned above and add the refresh_token parameter in your request and in response you will get a new token. GET https://login.windows.net/tmaasindia.com/oauth2/token?api-version=1.0 client_id=< Your registered Application Id> client_secret=<Your secret key saved earlier> & grant_type= refresh_token &redirect_uri= http://mysampleapp.com/callback &response_mode=form_post &scope=openid & refresh_token=<provide the refresh_token you received earlier> &resource=https://service.contoso.com/ &state=12345 &nonce=678910 On the successful response, you will get the request header parameters, mentioned below: { “token_type”: “Bearer”, “expires_in”: “3600”, “expires_on”: “”, “resource”: “https://service.contoso.com/”, “access_token”: “”, “refresh_token”: “” } Send a sign-out request To sign out from the app you must redirect the user to the end_session_endpoint. In case if user has failed to sign-out, the user will be able to reauthenticate your app without re-entering the credentials. GET https://login.microsoftonline.com/common/oauth2/logout? post_logout_redirect_uri= http://mysampleapp.com Conclusion This was just some part of the OpenID connect and OAuth0, there is much more to describe and talk about. In the next blog, I will share the implicit flow and explicit flow with working examples. You may find these useful: Related services & solutions Collaboration with SharePoint and Teams Automate workflows and empower teamwork All-in-one productivity solution with Microsoft 365 Increase your productivity Business productivity Adopt simplified access to data, apps and services Related Blogs How to deal with SharePoint Online list threshold? What’s new in SharePoint Server 2019? Create a Digital Workplace with SharePoint and OneDrive Digital Workplace with SharePoint and OneDrive How to Migrate SharePoint List Items to Project Online Migrate SharePoint List Items to Project Online WCF Service on Top Of SharePoint 2016 How to create and deploy
Dynamics 365 vs QuickBooks: 5 benefits for your business

In this blog post, I will talk about creating a content type in SharePoint site that anyone can use wherever and whenever needed. Site content type is a reusable collection of metadata (columns), workflow, behavior that helps provide consistency all over the site. These content types can be easily included in the lists and libraries. Let’s get started – Create a content type 1. Navigate to the site for which the site content type is to be created. 2. Click Settings and then click Site Settings. 3. Select Site content types under Web Designer Galleries. It will list all the existing content types, grouped on the basis of categories, like custom, community, Business, etc. 4. In the Show Group box, select the group and then choose Create 5. On the New Site Content page, provide a name and description for the new content type. 6. In the Parent Content Type section, select the name of the parent group and then choose the Parent Content Type. 7. In the Group section, check whether to keep the new content type in an existing group or to create a new group for the new content type. 8. Click OK. 9. After creating, content type page open up to add column to content type, select Add from existing Site column. 10. Select column from the groups to add and click on OK Bind a template with a site content type Custom document template such as Word, Excel, PowerPoint etc. can be integrated with content type, and below are the steps to it – Go to Site Settings, Site content typesfrom the galleries, and select the content type. Under Settings, click Advanced settings. Choose Enter the URL of an existing document template if it is already in the site and type the URL, or choose Upload a new document template, browse the file, select it, and then click Open Click Yes under Update all content types inheriting from this type? If all content types need to be updated that inherit from this content type, then click OK. This is how you can have custom content type created and ready to be used throughout.
Schedule SQL stored procedures using Azure Automation

While working on SharePoint 2013 (on-premise), we can easily move our development to another environment, which is not the case in SharePoint online. To combat this, I have created a PowerShell based solution, using which, you can easily move or create a SharePoint site. Here I share the steps to achieve this: Create Site collection with Blank template Publishing Feature Activation WSP Upload Apply Custom Template Assets Upload with Check-In Upload Master page and Page Layouts Set Master Page Create Page Add Web Parts on Pages Add list Item in List In this post, I will talk about the first four steps, and the rest in the next blog. Let’s start! Pre-requisite: – To create the site collection with custom template, create custom wsp package from the development environment. Download the assets file like Script, css, images, etc. Step – 1: Create Site Collection with Custom template To create the site with custom template, first create the site with blank template and then associate it with the custom template. a. To create a site collection, from Custom Template, choose <Select template later..> as shown b. Give inputs to mandatory fields such as site name, URL, etc. Click on OK and the Site Collection is created with blank template. Step – 2: Activate the required feature The site collection that we are creating requires the Infrastructure Feature to be activated. So, activate the infrastructure feature. Deployment with SharePoint Online Management Shell and DLL A. To deploy on SharePoint Online, we need SharePoint Online Management Shell with Site collection administrator rights. Download the SharePoint Online Management Shell from here B. Add required SharePoint client dlls as below : #Adding the Client OM Assemblies Add-Type -Path “FOLDER PATHDLLMicrosoft.SharePoint.Client.dll” Add-Type -Path “FOLDER PATHDLLMicrosoft.SharePoint.Client.Runtime.dll” Add-Type -Path “FOLDER PATHDLLMicrosoft.SharePoint.Client.Publishing.dll” C. Run SharePoint Online Management Shell as an admin and give the path of the script. Write script name and run like this: FileName.ps1 D. Enter inputs like: Site URL, Username, Password, FeatureGuid, IsSiteCollection. These inputs are to be added during the run time or they can be already added in the script. E.First authenticate the site with the username and the password $spoCtx = New-Object Microsoft.SharePoint.Client.ClientContext($siteUrl) $credentials = New-Object Microsoft.SharePoint.Client.SharePointOnlineCredentials($sUserName, $sPassword) $spoCtx.Credentials = $credentials return $spoCtx F. After successful authentication, call the feature activation function To activate the feature on site collection level, get site collection context as below: $spoSite= $spoCtx.Site G. Activate the feature using this chunk of code: Add the Guid ID ($sFeatureGuid) that needs to be executed $spoSite.Features.Add($sFeatureGuid, $true, [Microsoft.SharePoint.Client.FeatureDefinitionScope]::Farm) Write-Host “$spoCtx.RequestTimeout = Timeout.Infinite” $spoCtx.RequestTimeout = 5000*10000; Write-Host “ExecuteQuery !!” $spoCtx.ExecuteQuery() H. After the completion, the required feature has been activated. Step – 3: WSP Upload After feature activation, we are proceeding with using SharePoint Online Management Shell, how can we upload WSP on SharePoint Online A. Add full path of custom WSP package and assign it to the variable “$wspFullFilePath” B. Upload WSP to the Solution Gallery using the below line of code: $solutionGallery = $ctx.Web.Lists.GetByTitle(“Solution Gallery”) $solutionGalleryRootFolder = $solutionGallery.RootFolder $ctx.Load($solutionGallery) $ctx.Load($solutionGallery.RootFolder) $ctx.ExecuteQuery() C. Assign filename to specific variable as below: $wspFileName = “.wsp” $wspPackageName = “” $wspMajorVersion = #important $wspMinorVersion = #important D. Create the FileCreationInformation object as below: $fileCI = New-Object Microsoft.SharePoint.Client.FileCreationInformation $fileCI.Overwrite = $true $fileCI.ContentStream = $wspfileStream $fileCI.URL = $WspFileName E. Upload the created object to solution gallery as below $uploadedFile = $solutionGallery.RootFolder.Files.Add($fileCI); $ctx.Load($uploadedFile); $ctx.ExecuteQuery(); F. Now use below steps to install the solution: i. Create the DesignPackageInfo object $wsp = New-Object Microsoft.SharePoint.Client.Publishing.DesignPackageInfo $wsp.PackageGuid = [System.Guid]::Empty $wsp.PackageName = $wspPackageName $wsp.MajorVersion = $majorVersion $wsp.MinorVersion = $minorVersion ii. Install the solution from the file url $filerelativeurl = $solutionGallery.RootFolder.ServerRelativeUrl + “/” + $WspFileName; [Microsoft.SharePoint.Client.Publishing.DesignPackage]::Install($ctx, $ctx.Site, $wsp, $filerelativeurl) $ctx.ExecuteQuery() iii. Use below code to Apply or Activate the solution [Microsoft.SharePoint.Client.Publishing.DesignPackage]::Apply($ctx, $ctx.Site, $wsp); $ctx.ExecuteQuery() Note: The Install and Apply methods create a copy of the solution. This copy is renamed according to the Major and Minor Version specified in the DesignPackageInfo object. Once this copy is activated, we no longer need the original wsp file uploaded to the solution gallery. Below is the code to remove original WSP after getting renamed WSPs for Major and Minor Version specified in the DesignPackageInfo object: $uploadedSolutionFile = $solutionGallery.rootFolder.Files.GetByUrl($filerelativeurl); $uploadedSolutionFile.DeleteObject(); $ctx.ExecuteQuery() Step – 4: Apply Custom Template Below are the set of code to apply the template to web: A. Get root location of the web site: $web = $spoCtx.Site.RootWeb B. Apply custom template to the web, using its internal name as below $templateName = “{86EAF624-2B05-41E0-A552-AC875FE3737A}#AdvanceIntranetV4-19Dec” $web.ApplyWebTemplate($templateName) C. Update the web with applied custom template $web.update() $spoCtx.ExecuteQuery() Now that you have understood how this is done, I have the complete feature activation script for you below. You can directly copy paste the code with the required modifications. Here is the link of Script: I hope this was helpful. Stay tuned for my next blog where I will tell you how to upload the WSP in SharePoint Online.
Address key web vulnerabilities during app testing

As a Quality Analyst, bugs and quality are always a concern for the entire project team which has a notable impact on an organization’s business and client’s feedback. To provide excellent quality, the team must understand the core business context with the client requirements. On the other hand, the team should handle their code quality to make it less bug /error prone. There are various kinds of bugs such as functional, syntactic, communication, missing commands, Error handling exceptions, calculations and Control flow bugs. Apart from these, there are some non-functional bugs like performance issues, security concerns, and web app vulnerabilities. An application vulnerability is a weakness or a system flaw in a request which compromises the safety of the application. These flaws and vulnerabilities are used to exploit the application security and determine how to access it. The attacker has the potential to attack via threats and exploit the web vulnerability to facilitate a cyber crime. There are several types of web app vulnerabilities and are not limited to XSS or SQL injection. To make a secure web app, you must be aware of these vulnerabilities. Buffer Overflow A buffer overflow, or “buffer overrun” occurs when more data is placed into a fixed-length buffer than the buffer can handle. Adjacent memory space becomes overwritten and corrupted. As results, usually system crashes, although it increases the possibility for an attacker to run arbitrary code. CRLF Injection Used in HTTP Response Splitting. In the HTTP specification, there is a spec stating that the HTTP header is split from the data portion of the packet. This formatting split is defined by a carriage return and line feed or called a rn. Basically, by injection a rn somewhere in the HTTP header you can split an HTTP packet into two different packets. One packet will have the malicious payload, while the other packet holds the valid information. And this leads to proxy /web server cache poisoning, XSS, client web browser poisoning, website defacement and hijacking client session. Cross-Site Request Forgery (CSRF) CSRF is an attack through which a malicious site will send a request to the web application in which a user is already authenticated against a different website. In this manner, an attacker can access functionality at target web application via the victim’s already authenticated browser. Victim targets include web applications like in-browser email clients, social media, online banking and web interfaces for network devices. Cross-Site Scripting An XSS vulnerability occurs when the web applications take data from users as input and dynamically include it in web pages without properly sanitizing or validating the data. XSS vulnerabilities allow an attacker to execute capricious commands and display capricious results in a victim’s browser. These scripts embedded in a page that is executed on the client-side (in the user’s web browser) rather than on the server-side. XSS is a threat which is bought from the internet security flaw of client-side scripting languages, like HTML and JavaScript. In such a case victim is the application user and not the application, malicious content is delivered to users using JavaScript. And, malicious code executes for victim session to bypass necessary security restrictions. Directory Traversal It is a kind of HTTP exploit that is performed by attackers to acquire unauthorized access to restricted directories and files. Directory traversal, also known as path traversal. Directory traversal attacks target web server software to exploit weak security mechanisms and access directories and files stored outside of the webroot folder. There are two security mechanisms that web servers use to restrict user access: root directory and Access Control Lists (ACLs). Insufficient Transport Layer Protection Defined Insufficient Transport Layer Protection is a security weakness caused by applications due to not following any standards to protect network traffic. Meanwhile authentication, applications may use SSL/TLS, but they mostly fail to apply it, elsewhere in the application, thereby leaving data and session IDs exposed. Exposed data and session IDs can be intercepted, which means the application is vulnerable to exploit. Lightweight Directory Access Protocol (LDAP) Injection LDAP is a widely used open standard protocol for both querying and manipulating information directories. The LDAP protocol runs over Internet transport protocols, such as TCP. Web applications use the user-supplied input to create custom LDAP statements for dynamic web page requests. LDAP injection is the technique of exploiting web applications that use client-supplied data in LDAP statements without first stripping potentially bad characters from the request. SQL Injection SQL injection is a type of web application security vulnerability in which an attacker can submit a database SQL command, which is executed by a web application, exposing the back-end database. Injected SQL commands can alter SQL statement and compromise the security of a web application. SQL injection weaknesses occur when an application uses untrusted data, such as data entered into web form fields, as part of a database query. When an application fails to properly sanitize this untrusted data before adding it to a SQL query, an attacker can include their SQL commands which the database will execute.