4 Key Factors for Intranet Platforms | Advaiya

The first “intranet” was Yammer, which was just a place to share social updates with co-workers. Today organizations need an advanced platform they could customize that would allow them to share and organize files, too. Enterprises today battle with four common complaints with a traditional intranet: “I don’t know where to post.” “I don’t know how to post.” “I can’t find what I need.” “I can’t access what I need.” Also, it became apparent that a platform designed for desktop users who work in an office setting simply would not work for a mobile workforce. Organizations today employ associates across the globe, most of whom go online via their smartphones. We cannot expect our associates to wait until they could get to a computer to read important company news or file in their expenses. Simply put, the traditional platform is failing to give them the information they needed when and where they needed it. For a workplace intranet to be embraced quickly by your associates, a few key factors that enterprises should keep in mind when assessing intranet platforms: Leverage current investments. Choose a solution that can leverage your existing IT investments and can facilitate seamless integration with your current business enterprise. Customizability and ability to extend/alter easily. Your modern intranet set up should be adaptable to be tailored, modified and reconfigured to suit your organizational needs. Should not require dedicated content managers. It should be backed up with meta data driven technology to fetch information and surface it in an intuitive and contextual manner. Provide localization and personalization. Don’t underestimate the cost and time associated with searching for relevant information & news by the workforce. The platform you select should quickly display information & news based on location, job role, time of the day without having to search for it. We are excited about the change modern intranet can bring to your workplace and this brought us to creating AdVanced – Modern Intranet for O365. AdVanced allows you to quickly build a modern intranet for your organization. It brings together a contemporary and personalized “Home page @ work” for your team, allowing easy access to relevant information, documents, applications and people. Powerful configuration options enable the solution to fit your unique contexts. AdVanced comes with a bundle of widgets facilitating conversations, discovery and awareness powering all information activities that your team performs. The benefits: 1. Drive Employee Engagement a. Employee recognition, Feedback and participation, Corporate communications, Interest based content, modern workspace 2. Connect, coordinate and innovate a. Connect to right people, organize events and initiatives, ease processes for support, PTO, expense submission and more 3. Surface Right and Relevant Information a. Personalized content, Easy access to document libraries, Add dashboards and data widgets To experience AdVanced on a live instance. Register here www.advaiya.com/advanced
AdVanced – Modern Intranet for the Modern Workforce

Today we will talk about one of our extremely useful offerings for intranet and how do we enable a modern intranet quickly with your Office 365 setup. We will take you through what we believe a Modern Intranet is, what is kind of value that you get in your organization and how it can be useful for you? Advaiya has been a SharePoint solutions company since its inception. And we have a great experience of doing more than 500 SharePoint based projects across all the versions. We are Microsoft gold partner and we have competencies relating to analytics, collaboration & content, project & portfolio management. All that experience also allows us to understand the unique needs for various business verticals, various industry types and various applications areas relating to collaboration, social, project management, BI. How do you manage innovation and cohesion within your team? How do you have team engagement? How do you communicate in a way that employee engagement happens? What we believe is a Modern Intranet? The traditional view of intranet has been some sort of a web portal available inside your network to your employees. The definition as we look at it is quite dated. We believe a modern intranet should be one single platform which allows your team members to work together. An infrastructure that drives the key information activities i.e. how people within an information driven organization access information, collaborate with each, communicate with each other and get their work done. How do organizations perform the 3 key information activities i.e. Conversation, Discovery and Awareness? A modern intranet must enable these 3 in a way that it comes at a single place and employees need not have to go into different application, apps or portals to do that. All that available at your fingertips. What is AdVanced? AdVanced – Modern Intranet on O365 was developed keeping in mind how an intranet matures within an organization. It enables you to get to the next maturity level as you build, implement & adopt your intranet. The key thing about Modern Intranet is that it enables your home page at work. Single page for all your information and key activities – access to your applications, documents, social conversations, information, reports and people. It allows you to connect to team members and talk to the relevant people and fulfills the requirement of meaningful conversation. A modern Intranet must allow discovery of information in an intuitive and a useful manner. We have used information architecture and the metadata feature that are available in O365 and used them to enable a very smart way of surfacing right information for you. At the same time when we talk about Modern intranet and modern workforces we realize that today the employees, the teams, the people they are not just residing within your office, they are everywhere and they are not accessing your intranet from just one device but from their mobiles, tablets, perhaps kiosks from an airport so your intranet must be available everywhere. AdVanced is a rapidly deployable and completely configurable so that you are not locked into one way of working. It is developed in a way that drives real adoption. We believe your technology investment goes into waste when people don’t really use it. How do you make that happen is what modern intranet is all about? Let’s talk specifically about AdVanced which allows you to begin immediately with your modern intranet. We have created a set of applications, widgets and pages which are hosted on Office 365 and allows you to create home pages for all your employees and departments, allows your people to fetch information, get document and access applications in a very easy way. It is completely metadata driven i.e. it surfaces only role based information. It is does not require someone to manage the content. It fetches information from across your intranet and surfaces it in an intuitive contextual manner. Its built-on Office 365 and uses the O365 development best practices which means it is readily extensible, completely maintainable and we are also delivering regular enhancements such as new designs, new themes, new widgets, new applications which adds to the value of the Modern Intranet. To summarize AdVanced – Modern Intranet on Office 365 takes <48 hours to get started for any organization. With 6+ themes, 14+ built in widgets such as document libraries & file sharing, news & events, announcements, knowledgebase, social streams & corporate social networking, company/department policies, FAQ’s, quick links, upcoming birthdays, department heroes, kudos and many more such as task & project management, forms, polls & surveys, expense submission amongst others, is a rapidly configurable and easily customizable platform. It comes with unlimited departmental sites, responsive templates, team collaboration, intranet search, admin configurations amongst other highly functional features. Drive conversation, discovery and awareness with Advaiya AdVanced Pack for Modern Intranet and get started from day 1. To request a demo on AdVanced visit us on www.advaiya.com/advanced You can also write us at connect@advaiya.com or call us at +1-425-256-3123 | +91-294-305-1100
Estimating SharePoint licensing requirements

Most of the time when you are pitching a SharePoint based solution, your customer asks about ballpark costs of licensing and hardware, and the total cost of acquisition, which help them set their budgets. Here is how you can start to get a good estimate on the overall cost of SharePoint license acquisition. Most of the enterprise customers have dedicated licensing advisors or resource persons to advise on licensing and software budgeting. However, finding a total cost can be tricky in case you are thinking to implement a SharePoint solution on premise. While SharePoint is available as a part of Office 365 in both cloud as well as on premise, this article focuses on the understanding of licensing costs of implementing SharePoint solution on premise. All license estimates are based on Microsoft Open License without Software Assurance. Here, we would be making several assumptions to understand the total cost of licensing, and note that I am not covering the total cost of ownership (TCO) in this article, as it involves several other factors and considerations. To begin, let’s take a scenario where an organization is planning to implement SharePoint on premise for their own users, and there are no external users involved. Some of the users would be using advanced features like Business Intelligence solutions. So what would be the license requirements of implementing a SharePoint solution alone? (You can refer the link that describes SharePoint 2016 Licensing: https://products.office.com/en-us/sharepoint/sharepoint-licensing-overview) This article explains that for using SharePoint 2016 in an organization, the below three components are required – SharePoint Server 2016 – For each running instance of Server software SharePoint Standard CAL – CALs are Client access licenses required by each person or device accessing a SharePoint Server SharePoint Enterprise CAL – For accessing advanced features like business applications and business intelligence. Now let’s build the scenario further and imagine that the organization has 500 users, out of which 50 would be accessing advanced functionality (Enterprise CAL). Thus, the SharePoint licensing structure based on sizing and capacity planning for different functions implemented would be: (On a side note can get start from here for sizing and capacity planning) Table 1: SharePoint Licenses SharePoint Server 2016 2- 4 (web servers, content database servers and application server roles) SharePoint Standard CAL 500 SharePoint Enterprise CAL 50 (You can refer the link to get started on sizing and capacity planning) How we calculated numbers for CALs? Simple – as explained in the scenario above that the organization has 500 users, out of which 50 would be using advanced functionality like Business Intelligence and Business solutions – they would need Enterprise CAL. But why 500 Standard CAL, and not 450 as 50 users are already using Enterprise CAL? The reason is – SharePoint Enterprise CAL is additive – to access the Enterprise Edition features of SharePoint, a person/device must have both SharePoint Standard CAL and SharePoint Enterprise CAL. So this was all about initial licensing calculation, but what about pre-requisites? Let’s find out. Server License We begin with SharePoint Server pre-requisites, which are required for installation and deployment – Each SharePoint Web Server or Application Server requires Windows Server License, and Content database server requires SQL Server license that in turn requires Windows Server as a pre-requisite. Look at the table below for licensing pre-requisites for Servers. Table 2: Pre-requisites for Sharepoint, based on the assumptions: Role Numbers Pre-requisites Numbers Front-end web servers and application servers 2 Windows Server 2 Database Servers 2 SQL Server 2 Windows Server 2 In this case, total number of licenses required for server are: SharePoint Server – 2 (It does not need a SharePoint license for systems hosting SQL Server software if SharePoint Server components are installed on different hardware than SQL Server) Windows Server – 4 (Standard, Enterprise or Datacenter) SQL Server -2 (This only applies for full SQL Server databases and not for SQL Server Express) Client License We talked about server licensing requirements, but what about clients (persons or devices) accessing these services? We have already covered SharePoint CAL in Table 1 with explanation for each type of CAL, now let’s dig deep. If we check licensing terms (old but relevant) – users who access SharePoint need a Windows Server CAL, except when a user anonymously accesses SharePoint from the Internet. In our scenario, all users are internal and will require a Windows CAL. Now comes SQL Server CALs: Microsoft recommends that every user of every version of SharePoint counts as a user of SQL Server that hosts the SharePoint database. Such multiplexing means that every user and device needs to be licensed to access SQL server. For SQL server licensed as server-plus-CAL, each user and device accessing SharePoint will require a CAL for SQL server. Two exceptions to these guidelines are: ? No need for a SharePoint Server license for systems hosting SQL Server software, if SharePoint Server components are installed on different hardware than SQL Server. ? No need for an SQL server license, if SharePoint is installed on a single server with a built-in database—like in the case of deploying a small number of websites, where one wants to minimize administrative overhead. Thus, for above 500 users, we would require SQL CAL and Windows CAL, both. In case Windows Server and SQL Servers are processor based license, then no respective CALs are required to access these servers; otherwise for each user you will require a Windows and SQL CAL. So if we recalculate CALs, they would come out to be as listed in the table below: Table 3: Client Access Licenses (CALs) SharePoint Standard CAL 500 SharePoint Enterprise CAL 50 Windows CAL 500 SQL CAL 500 (Assuming that server licenses are not processor based) Thus, depending on the scenario and server license acquisition types, you have to consider licensing costs for pre-requisites and clients. In the above scenario, Windows Server, SQL Servers and their respective CALs were considered. In case you are budgeting only for SharePoint Servers and CALs, make sure that
Go AdVanced! Go beyond traditional intranet

Intranet has served a useful purpose of presenting information to an organization’s members. Though the traditional passive content publishing paradigm does not lend itself to the modern way of working which requires an engaging medium, context sensitiveness, continual freshening, and extreme flexibility. AdVanced is a rapidly deployable, highly flexible solution for Office 365, enabling key intranet features like central portal, enterprise social, department sites, and more. AdVanced finds the latest and relevant information from multiple sources and present them on the portal to deliver collaborative and engaging experience throughout. It uses the full potential of Microsoft enterprise technology including Office 365, Yammer, Office Delve and Graph, OneDrive to deliver interactive and seamless experiences. Below are some unique solution highlights: Content discovery and aggregation Keep the portal fresh, interesting and more engaging by automatically monitoring latest content, news, blogs, and event posts across subsites and surface them all to the home page. Based on “do less for more” concept, AdVanced provides ready-to-add generic content such as news, blogs, mandatory messages, and social images, to ensure consistent content style across department sites/subsites without any development effort. Contextual information and content Based on user’s skill, interest areas, department, and location, AdVanced Intranet provides personalized and relevant content – news, announcements, blogs, recent documents, and more to the user. By providing latest and contextual information on the portal, it helps organizations effectively engage employees per their interest and behavior. Keeps track of activities for the logged-in users and integrate it into the users’ profile to provide them contextual information including latest modified documents, recently interacted colleagues, and keep them more engaged. Easily deployable, configurable and customizable Pre-built color themes, interactive page layouts for sites and subsites. Templates and themes can be configured easily and quickly without any development effort. Widget Configuration feature to customize the portal as per business needs like changing the theme, changing the order of web parts on the home page without doing any development effort, and more. These are only some solution highlights of Modern Intranet based on office 365, and you can know more about it at AdVanced
Modern Intranet – Collaborate at the speed of your business

In today’s competitive marketplace, success is highly dependent on how easily your team can collaborate, access business information and quickly take decisions to grab a business opportunity. For effective collaboration and communication, regardless of the size or the industry, organizations have long been using corporate intranet portal where people can connect and share content with colleagues. In this modern era of cloud computing and superfast internet connections, intranet concept is also evolving. But first let’s talk about the challenges associated with traditional intranets. The traditional form of intranet was completely forced and mandatory, where users were restricted to the office premises during office hours and over office PCs only. Employees are frustrated with the inability to access business information. These conventional portals are only serving as a platform for static business information, outdated content and poor user experience. There is no latest and contextual content available on the portal for users, and thus organizations are unable to provide more engaging and better collaborative experience, leading employees to become disengaged and less productive at work. Also, employees are always using social networking sites to connect with their friends and families using their smartphone, and expect similar features and experience in the corporate intranet for business purpose. To address these common challenges, organizations considered a complete redesign of their corporate intranet but maintained the traditional approach of presenting information on the portal, thus after some time again these portals failed to engage employees to the level expected by them. Now organizations are looking for a new intranet approach and solution, which aligns with their business objectives and ensure the best return on investment. Organizations want to provide a digital workplace for all individuals, business teams, clients, and partners to share what’s happening across various businesses, and, discuss leveraging the best to their businesses. All this to enhance the internal communication by providing a channel to interact with cross business users. As every organization’s business needs and work culture is different, so one solution cannot fit all. There is a need of Modern Intranet approach specific to each organization for building a perfect digital workplace. Modern Intranet approach involves following key aspects: Auto content aggregation, surfacing all the latest and relevant information from all sources and channels Content personalization, contextual information based on user’s attributes Ready-to-go intranet portal with minimal customization Flexible and quickly configurable as per business needs Centralization of all communications and collaboration in the organization Responsive design for mobile devices Automatic recommendations and suggestions of new things for a user Real-time activity feeds from all sources and channels across businesses Social networking to connect people, build community, and fuel participation Linking of all internal key business applications on the portal to make navigation fast and easier Expect more details on these Modern Intranet aspects in my upcoming posts.
How to migrate SharePoint server 2013 to SharePoint server 2016
SharePoint 2016 has come with many enhancements, encouraging organizations to migrate to this latest version. This post will take you through a step by step process on how you can upgrade your SharePoint 2013 to SharePoint 2016. Note that you can upgrade your SharePoint instance from one server to another without any downtime. As this is a live migration, I would suggest you to take complete backup of the server and the database before continuing. [ Empower executives and employees across your organization to connect, converse, discover and work together at one central location to save time, increase productivity and boost engagement Know more at: Employee Intranet ] If you are running SharePoint 2010 and want to migrate, there is no method to migrate it directly to SharePoint 2016. Here are the steps that you need to follow: Create SharePoint 2013 farm Attach SharePoint 2010 database to SharePoint 2013 farm Upgrade site collections to full SharePoint 2013 mode Create a new SharePoint 2016 farm Attach SharePoint 2013 database to SharePoint 2016 database server Here I am assuming that you have done all the prerequisites before starting this migration process. That means you’ve already installed SharePoint 2016 server, but if you are finding difficulty to do so, you can follow my previous post here. Also, before starting the process go to your old SharePoint 2013 database Server, copy the WSS_Content content database of your site collection (which you want to migrate to SharePoint 2016) to the new SharePoint 2016 database server. Login to your old SQL Server Management Studio, select WSS_content ,go to task, and select copy database. 2. You will get a database copy wizard. Click on Next. 3. Verify source server properties. 4. Select the destination Server where you want to copy this WSS_contect DB. 5. In select the transfer method wizard, use SQL Management Object method if you want to do the migration without down time. 6. Select a database to copy. Select WSS_Content. Click on Next. 7. Configure the properties of a destination database. 8. Select Logins here. 9. Configure the package created. 10. Select Run immediately option. If you need to schedule them, select Schedule option. 11. Review the summary and click on Finish. 12. It will take a while to perform the operation. 13. Once the database is restored, go back to your SharePoint 2016 Central Administration and setup your SharePoint Web Application to use the copied WSS_Content database. Go to Application Management -> Manage Web Applications. 14. Create a new web application. 15.Set new web application properties. 16. Once the new application is created, open the SharePoint powershell as the administrator and run below commmands: Test your content database using command Test-SPContentDatabase -Name -Web Application 2. Dismount the new database which is created by detault when the site collection is created. Dismount-SPContentDatabase “” 3. Run the cmdlet to attach SharePoint 2013 content database to new SharePoint 2016 site collection. Mount-SPContentDatabase “WSS_Content_Home” -DatabaseServer “IN-SRV05” – WebApplication http://aspl-collab04/ 4. The upgrade will take 10 to 15 minutes to complete, and sometimes even an hour. Once it is completed, you will get a message like below: 5. If your SharePoint site has a customized web solution, then run cmdlet to add SP solution Add–SPSolution C:Service.wsp ( Path of wsp solution) 6. After adding SP solution, we need to install this solution to our newly created web application use cmdlet: Install-SPSolution –Identity Service.wsp –WebApplication http://aspl-collab04/ –GACDeployment And there you are! Now open your updated SharePoint site. Like you can see Advaiya’s updated SharePoint site as below:
Creating a customized HTML template with SharePoint page layout
In SharePoint there is a concept of creating pages using page layout. We can provide a template using page layout that has the look and feel of a page. Each page layout is associated with some content type, and each content type has fields where the page content is stored. And as we design a page layout, we can add field controls using Microsoft Office SharePoint Designer. Consider a requirement to provide a sample HTML with layout for creating a page, where the number of fields are not fixed. On the page, the user can add images, PowerPoint presentations, links to external sources. Also, the user can add multiple single line and multiline text fields. But there is a limitation on adding HTML controls; on a single page users cannot add multiple Publishing HTML controls. Now we see the steps to creating a layout with HTML: Open SharePoint Site using SharePoint designer. On the left menu, select Page Layout Library. Click on New Page Layout. A popup will open up. Select Publishing Content Type from the Content Type Group. Enter the URL Name and Title. In the place holder main section add “PublishingWebControls:RichHtmlField” control. In this add the tag “html” and put the sample HTML that you want as a template. READ MORE ARTICLES HOW TO ACCESS SHAREPOINT REST API USING OAUTH HOW TO CREATE AND DEPLOY WORD ADD-ON IN SHAREPOINT Save the page layout. Now create a page using the above page layout. Open Pages library from Site Content. On the ribbon, Click on Files-> New document-> Pages. Now enter the title, URL Name and select the page layout. Click Create. This will create a page in the page’s library with default HTML. To view the default HTML, open the page and click on the Edit button from the Ribbon. The default HTML template will be visible on the page. Now, edit the content in a predefined template and save the page. And here you get a new page created from the predefined template. NEED HELP IN SHAREPOINT? CONTACT US NOW Meeta Chopra SharePoint Development Architect Advaiya Solutions Inc Udaipur, Rajasthan, India TALK TO OUR EXPERT! CALL NOW CALL NOW
SharePoint 2016 & Project Server install for single server setup

In a traditional farm topology SharePoint, the common architecture in small and medium-sized environments is the two-tier design. This design utilizes two servers: one for the web front-end and application services and the other for database services with separate Active Directory Server. Now with SharePoint 2016, we have – MinRole, which is very similar to the other topology designs that we have been using with SharePoint 2013. We will discuss more about MinRoles while we install the same. [ Empower executives and employees across your organization to connect, converse, discover and work together at one central location to save time, increase productivity and boost engagement ] Here, we are installing SharePoint server 2016 along with Project server 2016 in a single server farm environment, where we have separate Active Directory and separate SQL Database server that is well suited for any small or medium-sized environments. Before proceeding to install SharePoint server 2016, we need to make sure our environment meets all of the pre-required configuration. MORE RELATED ARTICLES HOW TO EXPORT AN OUT OF THE BOX (OOTB) LIST VIEW WEB PART IN SHAREPOINT HOW TO DEVELOP & BIND CUSTOM TEMPLATE WITH CUSTOM CONTENT TYPE IN SHAREPOINT Software and Hardware Requirements- Along with the above requirements, Microsoft SharePoint products also require to install the following on a server farm: o Windows Management Framework version 3.0 o Application Server Role o Web Server (IIS) Role o Microsoft .NET Framework 4.5.2 o Update for .NET Framework 4(KB2898850) o SQL Server 2012 Service Pack 1 Native Client o Microsoft Identity Extensions o Microsoft Sync Framework Runtime v1.0 SP1 (x64) o Windows Server AppFabric 1.1 o Windows Identity Foundation v1.1 o Microsoft Information Protection and Control Client (MSIPC) o Microsoft WCF Data Services Service Account Requirement: Account Account Name and Purpose Requirements Server farm account or database access account We are using the username – SPAdmin The server farm account is used to perform the following tasks: SharePoint Products Configuration Wizard Configure and manage the server farm. Act as the application pool identity for the SharePoint Central Administration website. Domain user account Member of the local administrators group on each server. SQL Server login on the computer that runs SQL Server. Additional permissions are automatically granted for the server farm account on Web servers and application servers that are joined to a server farm. The server farm account is automatically added as a SQL Server login on the computer that runs SQL Server. The account is added to the following SQL Server security roles: dbcreator fixed server role securityadmin fixed server role db_owner fixed database role for all SharePoint databases in the server farm Install SharePoint prerequisites: • Login into the server with SPAdmin user. • Download and install SharePoint prerequisites from the SharePoint 2016 setup. • Run the setup as administrator, and choose install software pre-requisites. • Click on Next. On the next window, select “I accept the terms…” and click on Next. • Click on Finish to restart. After restarting, the pre-requisite tool will resume with the remaining installation. • After the installation is completed, the summary screen will show the status as below: • Click onFinish • Click on Install SharePoint Server. • Enter the Product Key and click on Continue • Click on “I accept the terms…” and click on Next • Choose the file location where you want to put your SharePoint configuration file. • Once the installation is done, click on Closeto start the configuration wizard. • When the SharePoint is installed, you will automatically be prompted to run the SharePoint 2016 Products Configuration Wizard, click on Next. • Choose Yes to restart the services and continue with the configuration wizard. • Select Create a new server farm option, and click Next. • On the next page, enter the configuration database name, database server name and user account details and click Next. Now you will get a new specific server role wizard which is also known as ‘MinRole’. In the earlier version of SharePoint, for a large SharePoint deployment plan, you needed to install SharePoint services with specific roles. For example, if you wanted all your end user requests to be placed on one server, then Web Front-End (WFE) server was used to handle your end user requests and similarly for the APP server, Search server, and Cache server. This complete process was quite complex and time taking. Now, you no longer have to worry about the services which should be started on which servers. By deploying your farm in a recommended MinRole topology, you can focus on what functionalities are needed to be enabled in your farm and let SharePoint take care of the rest. SharePoint 2016 server have six server roles as following: • Front-end: Services and components that serve for end user request are placed on web front end roles. • Application: Services and component that serve backend request like search crawl request are placed on application roles. • Distributed Cache: This role is assigned to servers to load balance end user requests among the front ends. • Search: This role is for services and components that are responsible for search indexing and crawling. • Custom: This role is reserved for services that needed to be isolated from other 3rd party application services. • Single-server farm: It doesn’t include SQL Server express. It includes all service application, services and components required for a single server farm. It is meant for the development, testing or small production environment. The first five roles are for multi-server farm environment and the last role is for a single server farm. Please note that while you select ‘Minrole’, either it would be a multiple server farm or a single server farm. If you are selecting a single server role here, then you will not be able to extend it into multiple server farm in future. Specify a port number for the Central Admin or you can use the default one. Also select the NTLM installation mode at this point, and press Next. • This wizard would take 20
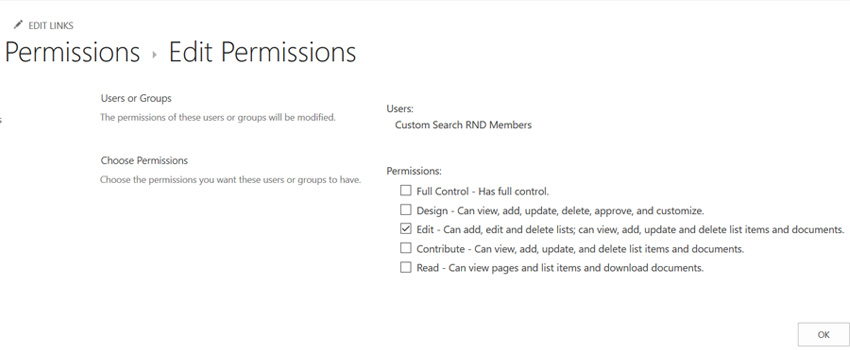
SharePoint Workflow: Update list item across other site list
Recently, in one of my projects there was a requirement to create a SharePoint list workflow that triggers when an item is created, and that should result in creating a new list item on another SharePoint list which is created on some other SharePoint instance. I knew the default copy list item activity will not work in this scenario as both lists are not on the same SharePoint site. The straight forward solution to this on top of my mind was to use ‘Call HTTP Service’ activity by calling SharePoint REST services with POST method, and create the item on another list. But this required to run the workflow with elevated permissions.[ Empower executives and employees across your organization to connect, converse, discover and work together at one central location to save time, increase productivity and boost engagement Know more at: Office 365 Intranet ] In this blog, I will first talk about the required configuration to do this cross site stuff and then brief out the steps to call the SharePoint Rest Service: Enable workflow elevated permissions – Below are the high-level steps to do enable the workflow: Allow the workflow to use app permissions in a SharePoint Server 2013/Online site. Grant full control permission to the workflow. Wrap the call action inside app step. You may follow the detailed steps from Workflow with elevated permissions by using the SharePoint 2013 Workflow platform Note: You will need to enable the workflow elevated permissions on both the sites. I followed the below process: Get the App Id from the first site where the List workflow is created to Call HTTP Service as below Go to Site Settings, under Users and Permissions, and click Site app permissions. On the permission page, the App Identifier column displays the value. Here, copy the GUID value before @ symbol. With this App Id, enable the workflow elevated permissions where the SharePoint List workflow is created using this link – Workflow with elevated permissions by using the SharePoint 2013 Workflow platform Navigate to another SharePoint site where the list item is to be created [Note: This is required only when your lists are not on same site/site collection] Use the App Id you get in step 1 from first site and perform step 2 on this site. More Interesting Read SHAREPOINT LIST WORKFLOW: CREATE OR UPDATE LIST ITEM ON ANOTHER SHAREPOINT SITE LIST HOW TO ACCESS SHAREPOINT REST API USING OAUTH Get the target metadata type for HTTP Call: To do this you need the Odata service URL of the list where you need to create the list item. Use the below link and replace placeholders with actual values https:////_api/web/lists/getbytitle(”)/items Navigating this link displays xml/json in this search ‘ Now you are done with the required configurations to use Call HTTP Service activity to create item on another SharePoint site list. For calling the SharePoint REST Service, you may refer this link – Using SharePoint REST services from workflow with POST method, which greatly helped me to quickly configure the workflow. The changes to do in the created workflow are: Use the service URL https:////_api/web/lists/getbytitle(”)/items of another site where you need list item to be created. Keep the ‘Call HTTP Service’ activity in the App Step. While configuring the Build dictionary which we call metadata, the type value should be the term value you get in the section ‘Get the target metadata type for HTTP Call’ instead of SP.Data.WorkflowItemsListItem Once you are done with this, save and publish the workflow. Now your workflow is ready to test. When you create/update (depending on your configuration) a list item in current SharePoint list, it will create a list item in another SharePoint site list, the URL of which you configured in the workflow. And this way you can update the list items on external SharePoint sites. Note that this process works on SharePoint 2013 List workflows only, as earlier versions do not have Call HTTP Service activity available. Need Help in Sharepoint? Contact Us Now!