To start working with Sitecore, first of all you need to install Sitecore on your system and setup a development environment. Here in the blog I describe the easy steps to setup the environment for you. You can download the latest version of Sitecore from SDN. Sitecore CMS is distributed in two ways- It can be downloaded as an .exe file or one can get a ZIP file i.e. “an archived copy of a Sitecore CMS solution”. Downloading ZIP file gives more control on the installation and it’s easy to use.
On extracting the ZIP file, you will find three logical components/folders:
– WebSite : IIS document root
– Data: Store for logs and data.
– Database: Relational database files used by Sitecore solution
To install Sitecore 8.0, the basic hosting environment requirements are:
- Microsoft .NET Framework 4.5
- Microsoft SQL Server 2008 R2 SP1
- IIS 7.0
- Sitecore License File
Sitecore installation uses three databases, mainly:
– Master: It contains every version of all the content and data items
– Web: It contains most recent version of all the content and data items. Data on published site is rendered using this database.
– Core: It contains Sitecore settings and.Net membership provider tables for User/Role management
Steps to Install Sitecore using ZIP file:
1. Choose a parent directory path for the project, for example – C:inetpub
2. Create a Folder with project name, for example – Sitecoredemo, and extract the ZIP folder inside that at the location C:inetpubSitecoredemo. The extraction will create folders as below:
– C:InetPub Sitecoredemo Website
– C:InetPub Sitecoredemo Data
– C:InetPub Sitecoredemo Databases
3. Place the license.xml file to the /Data folder
4. Change the location of /Data folder in the web.config file placed inside Website folder to use the absolute path as below:
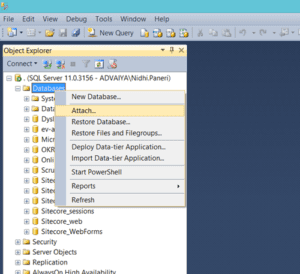
5. Open SQL server Management Studio and attach all these three databases (Core, Master & Web) using .mdf files placed in Databases folder.
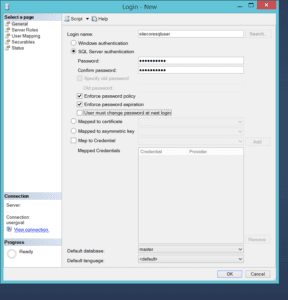
6. Create new SQL server login and select User Mappings tab
7. Select Sitecore databases one by one and select the following check boxes In the Database role membership for field.
For Master and Web databases
db_datareader
db_datawriter
public
For Core database
aspnet_Membership_BasicAccess
aspnet_Membership_FullAccess
aspnet_Membership_ReportingAcces
aspnet_Profile_BasicAccess
aspnet_Profile_FullAccess
aspnet_Profile_ReportingAccess
aspnet_Roles_BasicAccess
aspnet_Roles_FullAccess
aspnet_Roles_ReportingAccess
db_datareader
db_datawriter
public
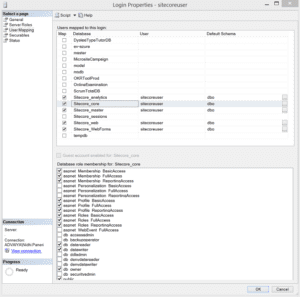
8. Modify the ConnectionStrings.config file placed inside /Website/App_Config/ folder by providing values in a line for each database, for example:
9. Open IIS, create new Application Pool by inserting Projectname, appropriate .Net framework version and set managed pipeline mode as Integrated.
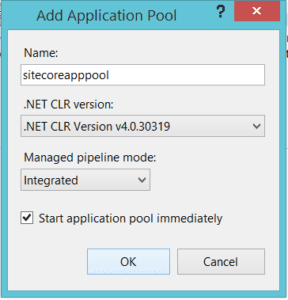
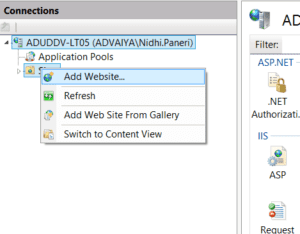
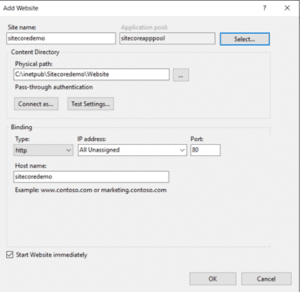
10. Now create new website in IIS by providing sitename as Sitecoredemo, Application Pool name as the newly created App Pool name, set physical path to the Website folder located at:
C:InetPub Sitecoredemo Website
11. Limit anonymous users access to following folders inside /website
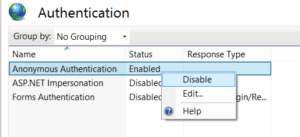
/App_Config
/Sitecore/admin
/Sitecore/debug
/Sitecore/shell/WebService
Go to the Authentication panel and disable Anonymous Authentication for these folders.

12. Add following entry in your hosts file located at:
C:WindowsSystem32driversetc:
127.0.0.1 Sitecoredemo
13. Now access your website by browsing the below address:
You can access the Admin section using the below address:
http://Sitecoredemo/sitecore
With this, you complete your local development environment set up and now you can start with your development work.
I will be discussing the set up of website solution in Visual Studio in my next blog.
Advaiya has the Sitecore experience and expertise to integrate Sitecore solution with your business critical systems like ERP and CRM. You can contact us anytime to help you get the most out of this powerful content management system.


